 Jquery 垂直滚动条移动到指定位置
 2014/03/20 15:58 | by 刘新修 ]
- $("html,body").animate({scrollTop: $("#box").offset().top}, 1000);
在底部放一个id是box的标签就可以了。
 phpcms_v9推送到其他栏目后再在其他栏目删除导致数据库出错
 2014/03/19 18:07 | by 刘新修 ]
修改phpcms/model/content_model.class.php大概454行的update_category_items()函数
- private function update_category_items($catid,$action = 'add',$cache = 0) {
- $this->category_db = pc_base::load_model('category_model');
- if($action=='add') {
- $this->category_db->update(array('items'=>'+=1'),array('catid'=>$catid));
- } else {
- $this->category_db->update(array('items'=>'-=1'),array('catid'=>$catid));
- }
- if($cache) $this->cache_items();
- }
修改为:
- private function update_category_items($catid,$action = 'add',$cache = 0) {
- $this->category_db = pc_base::load_model('category_model');
- if($action=='add') {
- $this->category_db->update(array('items'=>'+=1'),array('catid'=>$catid));
- } else {
- $r =$this->category_db->get_one(array('catid'=>$catid));
- if($r['items']>0)
- {
- $this->category_db->update(array('items'=>'-=1'),array('catid'=>$catid));
- }
- //$this->category_db->update(array('items'=>'-=1'),array('catid'=>$catid));
- }
- if($cache) $this->cache_items();
- }
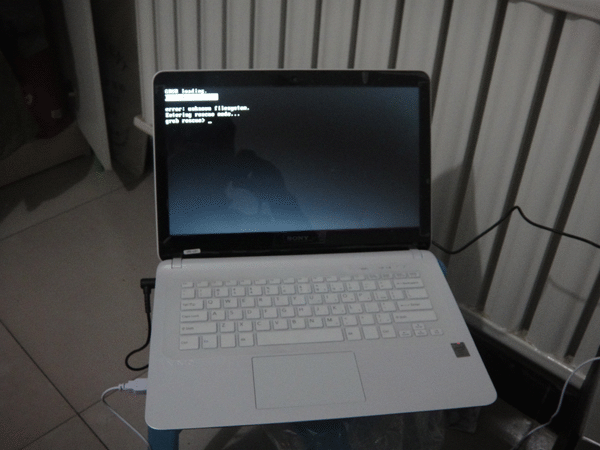
 linux重装WIN系统后出现—error:unknown filesystem.(问题解决)
 2014/03/17 21:21 | by 刘新修 ]
GRUB loading.
Welcome to GRUB!
error:unknown filesystem.
Entering rescue mode...
grub rescue>_
*****************************************
问题原因是之前linux(红旗版本)格式化整块硬盘后,还要对硬盘【重建主引导记录(重建MBR)】
把硬盘所有的分区都删除之后--> 选择硬盘下拉菜单-->重建主引导记录(重建MBR)-->之后再划分新的硬盘分区。
然后用PE安装系统到第一主分区(C盘)文件解决!
 Mysql更改用户密码
 2014/03/13 15:08 | by 刘新修 ]
10,启动mysql服务
[root@localhost mysql-5.5.33]# /etc/init.d/mysqld start
/usr/local/mysql/bin/mysqladmin -u root password '999999'
11,启动完成之后用ps -ef |grep mysql 命令查看是否启动
12,/usr/local/mysql/bin/mysql -u root -p
通过命令行登录管理MySQL服务器 初始密码为空
13,修改root密码
mysql>;use mysql;
mysql>; update user set password=PASSWORD("999999") where user='root';
mysql>; update user set host="%" where user="root" and host="localhost";
mysql>; FLUSH PRIVILEGES;
mysql>; flush privileges;
×××××××××××××××××××××××××××××××××××××××××××××××××××
删除host不是:%/127.0.0.1/localhost 的记录,删除用户字段为空的记录
delete from user where host !='%' and host !='127.0.0.1' and host !='localhost';
delete from user where user='';
delete from user where title like '%cheng人网%';
&&&&&&&&&&&&&&&&&&&&&&&&&&&&&&&&&&&&&&&&&&&&&&&&&&&&&&&&&&&
设置软链接方便执行mysql短标签命令【mysql -u root -p】
ln -sf /usr/local/mysql/bin/mysql /sbin/mysql
ln -sf /usr/local/mysql/bin/mysqladmin /sbin/mysqladmin
ln -sf /usr/local/mysql/bin/mysqldump /sbin/mysqldump
&&&&&&&&&&&&&&&&&&&&&&&&&&&&&&&&&&&&&&&&&&&&&&&&&&&&&&&&&&&&&
注册Apache为Service
cp /usr/local/apache/bin/apachectl /etc/init.d/httpd
&&&&&&&&&&&&&&&&&&&&&&&&&&&&&&&&&&&&&&&&&
就可以使用:
service httpd start
service httpd restart
service httpd stop
&&&&&&&&&&&&&&&&&&&&&&&&&&&&&&&&&&&&&&&&&&&
在末尾增加以下内容,自动启动服务:
vi /etc/rc.local
&&&&&&&&&&&&&&&&&&&&&&&&&&&&&&&&&&&&&&&&&&&&&
ulimit -SHn 65535
/etc/init.d/mysqld start
/etc/init.d/httpd start
 查看Linux发行版本
 2014/01/26 15:40 | by 刘新修 ]
这个命令适用于所有的linux,包括Redhat、SuSE、Debian、Centos等发行版。
root@MyMail ~ # uname
Linux
root@MyMail ~ # uname -r
2.6.18-164.el5
[root@localhost ~]# uname -a
Linux localhost.localdomain 2.6.18-194.el5 #1 SMP Fri Apr 2 14:58:35 EDT 2010 i686 i686 i386 GNU/Linux
****************************************************************************************
以下二种方法适用于RedHat,CentOS
root@MyMail ~ # cat /etc/redhat-release
CentOS release 5.4 (Final)
 设置SSH自动断开连接时间间隔
 2014/01/22 22:22 | by 刘新修 ]
vi /etc/ssh/sshd_config
找到选项
#ClientAliveInterval 0
修改为
ClientAliveInterval 1800
重启sshd 服务
service sshd restart
这样,超过1800秒(半个小时)没有动作的情况下,sshd服务才会中断连接。
***************************************************************************
网上很多文章都说,远程SSH连接的超时设定是在/etc/ssh/sshd_config里,使用ClientAliveInterval和ClientAliveCountMax选项,我原来也这么认为的,不过一直没配置过超时。
一般修改两个地方可将这烦人的问题解决
1、echo $TMOUT
如果显示空白,表示没有设置, 等于使用默认值0, 一般情况下应该是不超时. 如果大于0, 可以在如/etc/profile之类文件中设置它为0.
Definition: TMOUT: If set to a value greater than zero, the value is interpreted as the number of seconds to wait for input after issuing the primary prompt. Bash terminates after waiting for that number of seconds if input does not arrive
2、修改/etc/ssh/sshd_config文件,将 ClientAliveInterval 0和ClientAliveCountMax 3的注释符号去掉,将ClientAliveInterval对应的0改成60,ClientAliveInterval指定了服务器端向客户端请求消息 的时间间隔, 默认是0, 不发送.而ClientAliveInterval 60表示每分钟发送一次, 然后客户端响应, 这样就保持长连接了.ClientAliveCountMax, 使用默认值3即可.ClientAliveCountMax表示服务器发出请求后客户端没有响应的次数达到一定值, 就自动断开. 正常情况下, 客户端不会不响应.
最后记得执行/etc/init.d/sshd restart 哦,否则刚才的修改是不会生效的。
想参考更多,请输入man sshd_config了解更多信息
大家这下明白了吧,是不是现在觉得很爽,在使用SSH Secure Shell Client链接LINUX的时候再也不会超时和自动断开了,也不会再出现烦人的 server responded "connection closed" 错误提示了,很开心吧!
 开启/订制Apache目录列表样式
 2014/01/14 18:00 | by 刘新修 ]
开启Apache目录列表:
首先找到/usr/local/apache/conf/httpd.conf 文件搜索
#Include conf/extra/httpd-autoindex.conf (去掉注释# 启用)
修改/usr/local/apache/conf/extra/httpd-autoindex.conf
注释掉:#IndexOptions FancyIndexing HTMLTable VersionSort
启用:indexOptions FancyIndexing ScanHTMLTitles NameWidth=128 DescriptionWidth=256 HTMLTable VersionSort FoldersFirst
#######################################################################
之后遇到Apache列表索引中文乱码问,在httpd-autoindex.conf文件中添加:Charset=GBK
indexOptions Charset=GBK FancyIndexing ScanHTMLTitles NameWidth=128 DescriptionWidth=256 HTMLTable VersionSort FoldersFirst
重启Apache问题解决~
虚拟主机配置处添加:
- <Directory "/data/web_bk">
- Options Indexes FollowSymLinks
- AllowOverride All
- Order allow,deny
- Order deny,allow
- Allow from all
- </Directory>
Apache 配置显示版本信息:
- ########### Add ##############
- AddDefaultCharset GBK
- ServerSignature On
- ########### Add ##############
- Include shost/*.conf
 设置Discuz论坛伪静态
 2014/01/14 17:06 | by 刘新修 ]
把下面代码添加到:
<VirtualHost *:80>
DocumentRoot /data/web_bk/bbs.XXXnet/htdocs
ServerName bbs.XXX.net
<Directory "/data/web_bk/bbs.3snews.net/htdocs">
这里.....
</Directory>
</VirtualHost>
- # 将 RewriteEngine 模式打开
- RewriteEngine On
- # Rewrite 系统规则请勿修改
- RewriteCond %{QUERY_STRING} ^(.*)$
- RewriteRule ^topic-(.+)\.html$ portal.php?mod=topic&topic=$1&%1
- RewriteCond %{QUERY_STRING} ^(.*)$
- RewriteRule ^article-([0-9]+)-([0-9]+)\.html$ portal.php?mod=view&aid=$1&page=$2&%1
- RewriteCond %{QUERY_STRING} ^(.*)$
- RewriteRule ^forum-(\w+)-([0-9]+)\.html$ forum.php?mod=forumdisplay&fid=$1&page=$2&%1
- RewriteCond %{QUERY_STRING} ^(.*)$
- RewriteRule ^thread-([0-9]+)-([0-9]+)-([0-9]+)\.html$ forum.php?mod=viewthread&tid=$1&extra=page\%3D$3&page=$2&%1
- RewriteCond %{QUERY_STRING} ^(.*)$
- RewriteRule ^group-([0-9]+)-([0-9]+)\.html$ forum.php?mod=group&fid=$1&page=$2&%1
- RewriteCond %{QUERY_STRING} ^(.*)$
- RewriteRule ^space-(username|uid)-(.+)\.html$ home.php?mod=space&$1=$2&%1
- RewriteCond %{QUERY_STRING} ^(.*)$
- RewriteRule ^blog-([0-9]+)-([0-9]+)\.html$ home.php?mod=space&uid=$1&do=blog&id=$2&%1
- RewriteCond %{QUERY_STRING} ^(.*)$
- RewriteRule ^archiver/(fid|tid)-([0-9]+)\.html$ archiver/index.php?action=$1&value=$2&%1
--prefix=/usr/local/PHP php 安装目录
--with-apxs2=/usr/local/apache/bin/apxs 表示使用apache2.0以上版本,apxs表示使用的apache1.0版本
--with-config-file-path=/usr/local/PHP/etc 指定php.ini位置
--with-MySQL=/usr/local/mysql mysql安装目录,对mysql的支持
--with-MySQLi=/usr/local/mysql/bin/mysql_config mysqli文件目录,优化支持
--enable-safe-mode 打开安全模式
--enable-ftp 打开ftp的支持
--enable-zip 打开对zip的支持
--with-bz2 打开对bz2文件的支持
--with-jpeg-dir 打开对jpeg图片的支持
--with-png-dir 打开对png图片的支持
--with-freetype-dir 打开对freetype字体库的支持
--without-iconv 关闭iconv函数,种字符集间的转换
--with-libXML-dir 打开libxml2库的支持
--with-XMLrpc 打开xml-rpc的c语言
--with-zlib-dir 打开zlib库的支持
--with-gd 打开gd库的支持
--enable-gd-native-ttf 支持TrueType字符串函数库
--with-curl 打开curl浏览工具的支持
--with-curlwrappers 运用curl工具打开url流
--with-ttf 打开freetype1.*的支持,可以不加了
--with-xsl 打开XSLT 文件支持,扩展了libXML2库 ,需要libxslt软件
--with-gettext 打开gnu 的gettext 支持,编码库用到
--with-pear 打开pear命令的支持,PHP扩展用的
--enable-calendar 打开日历扩展功能
--enable-mbstring 多字节,字符串的支持
--enable-bcmath 打开图片大小调整,用到zabbix监控的时候用到了这个模块
--enable-sockets 打开 sockets 支持
--enable-exif 图片的元数据支持
--enable-magic-quotes 魔术引用的支持
--disable-rpath 关闭额外的运行库文件
--disable-debug 关闭调试模式
--with-mime-magic=/usr/share/file/magic.mime 魔术头文件位置
CGI方式安装才用的参数
--enable-fpm 打上PHP-fpm 补丁后才有这个参数,CGI方式安装的启动程序
--enable-fastCGI 支持fastcgi方式启动PHP
--enable-force-CGI-redirect 同上 ,帮助里没有解释
--with-ncurses 支持ncurses 屏幕绘制以及基于文本终端的图形互动功能的动态库
--enable-pcntl freeTDS需要用到的,可能是链接mssql 才用到
mhash和mcrypt算法的扩展
--with-mcrypt 算法
--with-mhash 算法
--with-gmp
--enable-inline-optimization
--with-openssl openssl的支持,加密传输时用到的
--enable-dbase
--with-pcre-dir=/usr/local/bin/pcre-config perl的正则库案安装位置
--disable-dmalloc
--with-gdbm dba的gdbm支持
--enable-sigchild
--enable-sysvsem
--enable-sysvshm
--enable-zend-multibyte 支持zend的多字节
--enable-mbregex
--enable-wddx
--enable-shmop
--enable-soap
 解决php的It is not safe to rely on the system’s timezone settings的问题
 2014/01/11 17:31 | by 刘新修 ]
date
Warning: phpinfo() [function.phpinfo]: It is not safe to rely on the system's timezone settings. You are *required* to use the date.timezone setting or the date_default_timezone_set() function. In case you used any of those methods and you are still getting this warning, you most likely misspelled the timezone identifier. We selected 'America/New_York' for 'EST/-5.0/no DST' instead in /usr/local/apache/htdocs/index.php on line 2
http://tiyan100.gd.chinamobile.com/
解决办法,在php.ini里加上
date.timezone = PRC
修改完成重启Apache时间还是错误,查看phpinfo页面信息显示:Loaded Configuration File为:none
Configuration File (php.ini) Path:/usr/local/php/etc 把php.ini 拷贝到该目录
全路径 /usr/local/php/etc/php.ini
之后再重启Apache,


